There’s something awe-inspiring about the camel; the way it moves across the desert sand, its uniquely shaped hump, and its ability to travel vast distances without water. As a photographer, capturing these majestic creatures in all their glory can be an exciting challenge. But where do you start? How do you approach camel photography, and what opportunities are available for exploring this subject from different angles and perspectives? In this article, we’ll take you through the steps for successful camel photography, from understanding camel behavior to playing with different perspectives, and finally to post-processing tips for bringing out the best in your images. So grab your camera gear and let’s begin our journey into the world of camel photography.
Contents
- Preparing for Your Camel Photo Shoot
- Capturing Camels from Different Angles
- Playing with Perspectives in Camel Photography
- Post-Processing Tips for Camel Photography
- Conclusion
-
Frequently Asked Questions
- What is camel photography?
- What is the best time of day for camel photography?
- Can I use a smartphone camera for camel photography?
- What should I wear when photographing camels?
- Is it safe to get close to camels?
- Do I need a permit to photograph camels?
- How do I capture unique perspectives in camel photography?
- What editing software is best for camel photography?
- What should I consider when cropping and straightening camel images?
- What is the most important factor in camel photography?
- References
Preparing for Your Camel Photo Shoot
As you plan your camel photo shoot, it’s important to consider various factors that will impact the outcome of your photos. Proper preparation can make your experience more enjoyable and ultimately lead to the best possible shots. Understanding camel behavior, selecting the right camera equipment, and preparing for the desert environment are all crucial steps you should take before heading out on your adventure. Whether you’re interested in wildlife photography or travel photography, these tips will help you capture stunning camel photos from a variety of angles and perspectives. To learn more about the history of camels in photography, check out this article.
Understanding Camel Behavior
Understanding Camel Behavior is crucial in getting the best shots for your camel photography session. As with any wildlife, it’s essential to have an idea of what to expect from your subject before engaging with it. Here are some basic behaviors to keep in mind when photographing camels:
| Behavior | Description |
| Posture | Camels are known for their unique posture, making them one of the most recognizable animals in the world. They stand tall with their heads held high, making them an excellent subject for portraits. |
| Movements | Camels are known for their slow, rhythmic movements. They tend to move their legs in unison, creating a soothing effect. They also tend to sway from side to side while they walk, which can be an interesting motion to capture in photographs. |
| Social Interaction | Camels have a social hierarchy, and it’s common to see camels interact with each other in herds. They may nuzzle each other, groom one another, or stand close together. This behavior can make for great candid shots. |
| Personal Space | It’s essential to respect a camel’s personal space. They tend to get spooked easily, so it’s best to approach them slowly and quietly. Be mindful of any signs of discomfort or agitation, and back off if necessary. |
| Temperament | Camels are generally docile animals, but they can become aggressive if they feel threatened or scared. Be sure to approach them calmly and with caution. |
Understanding these behaviors and being able to recognize them can help you capture the best shots of these incredible creatures. For example, using their unique posture to create portraits or capturing their slow movements can result in stunning photos. However, it’s also important to be mindful of their personal space and temperament to ensure your safety and that of the animal.
Selecting the Right Camera Equipment
Selecting the Right Camera Equipment:
Choosing the right camera equipment is crucial to capture stunning camel photographs. Here are some tips to select the right gear for your camel photography:
- Camera: The camera you choose for your camel photography should have a fast autofocus system and high burst rate to capture the fast-moving animals. Full-frame mirrorless cameras or DSLRs are great options for this type of photography.
- Lens: A telephoto lens with a focal length of at least 200mm is best for capturing camels from a distance. A wide-angle lens can also be useful while shooting camel herds or a camel caravan in the desert landscape.
- Filters: Polarizing filters can be used to control reflections on the surface of the sand and water. Neutral density filters can be used to control the depth of field and exposure settings in harsh sunlight.
- Tripod: A sturdy tripod is necessary to stabilize your camera in the sandy and windy environment. It will also help you take clean shots while shooting from ground level or from a dune.
- Accessories: Additional accessories like extra batteries, memory cards, and lens cleaning kit can be helpful in the desert environment.
Make sure to pack all the essential camera equipment before heading out for your camel photo shoot. With the right gear in hand, you can capture some of the best camel photos that will remain with you for a lifetime.
If you want to learn more about camel photography, check out some resources like “Camels in Photography”, “Famous Photographers Capturing Camels” or “Using Lighting for Camel Photography”.
Preparing Your Gear for the Desert Environment
When preparing your gear for a camel photography shoot in the desert, there are several crucial steps you need to take to ensure that your equipment is protected from the harsh environment. Here are some tips to help you get started:
- Dust-proof your equipment: The desert environment is full of dust, sand, and other tiny particles that can easily damage your camera and lenses. It is essential to keep your gear as clean as possible by covering it with a plastic bag or a fabric wrap. Use a camera rain cover to protect your camera and lens from sand and dust.
- Protect your lenses: Sand and dust particles can easily scratch your lenses. Bring lens cleaning supplies such as a blower, a microfiber cloth, and a lens cleaning solution. Keep them in a separate pouch to avoid contamination. A lens hood provides an extra layer of protection for your lenses.
- Bring extra camera batteries and memory cards:The desert is a rugged environment with no power outlets or computer stores conveniently available. Make sure you pack extra camera batteries and memory cards in your camera bag. Consider a separate memory card holder and label your cards to avoid mixing them up.
- Wear proper clothing and shoes: Dress in layers, and wear comfortable walking shoes. Protect your skin from the sun by wearing a hat and applying sunscreen. Avoid wearing sandals, flip flops, or open-toed shoes as these could hurt your feet from small stones.
- Bring a tripod: Shooting in the desert often means dealing with harsh sunlight and long shadows. A tripod helps you take better shots by keeping your camera stable and level when shooting at slower shutter speeds. Some creative photographers put their cameras on the ground, leveled with the sand, and use a remote or cable release.
Make sure you are always prepared for any eventuality that may occur when photographing camels in the desert. It’s better to carry more than to run short of the valuable gear in the middle of a shooting session.
Proper preparation will help you enjoy a great photo shoot without worrying about damaging your gear in the harsh environment of the desert. Once you have everything packed and ready, you can focus on getting the best shots of the camels, whether you are taking a portrait or wildlife photos, capturing unique Middle Eastern landscapes or documenting your travel photography adventure.
Capturing Camels from Different Angles
When it comes to camel photography, capturing the majestic creatures from different angles can help you create unique and compelling images. From shooting at ground level to using a drone for aerial shots, there are many ways to experiment with perspectives and angles. By doing so, you can showcase the beauty and grace of camels in ways that haven’t been seen before. Let’s dive into some of the techniques you can use to capture stunning camel photos. And if you’re interested in learning more about wildlife photography, check out our guide on capturing stunning wildlife photos.
Shooting from Ground Level
When it comes to camel photography, one of the most interesting ways to capture these majestic animals is by shooting from ground level. This perspective allows us to capture their unique characteristics and portray them in a new light. Below, we’ll explore some tips and tricks for shooting camels from ground level to create stunning images.
| Tip #1: Get Low: | When photographing camels from ground level, it’s important to get as low as possible. This allows you to capture the details and textures of the sand, as well as the camels’ intricate features. |
| Tip #2: Use Wide Angle Lens: | Wide angle lenses are the perfect tool for shooting camels from ground level. This type of lens helps to add depth to your images and showcase the vastness of the desert landscapes. |
| Tip #3: Pay Attention to Composition: | When shooting camels from ground level, it’s important to pay attention to the composition of your images. Try to capture interesting foreground elements, such as footprints or plants, to add interest to your photos. |
| Tip #4: Shoot During the Golden Hour: | The golden hour, which is the time just after sunrise or just before sunset, is the perfect time to shoot camels from ground level. The soft, warm light during this time adds a beautiful glow to your images, making them even more stunning. |
| Tip #5: Experiment with Angles: | Don’t be afraid to experiment with different angles when shooting camels from ground level. Try shooting from a low angle and tilting your camera up to capture the sky, or shoot with a wide angle lens and get up close to the camels for a unique perspective. |
By following these tips, you’ll be able to capture stunning images of camels from ground level that showcase their unique characteristics and the beauty of their desert habitat.
Using a Drone for Aerial Shots
When it comes to capturing unique and breathtaking shots of camels, using a drone for aerial photography can take your pictures to the next level. Using a drone for aerial shots allows you to capture stunning perspective from above and experiment with different angles and compositions.
Before taking your drone out for a spin in the desert, make sure you have the necessary permits and follow regulations set by your local authorities. It’s also important to fully charge your drone’s battery and pack an extra one, as the desert environment can quickly drain batteries.
When using a drone for aerial shots, it’s essential to practice safety measures, such as staying aware of your surroundings and avoiding flying near other animals or humans. Additionally, it’s important to check and adjust the settings on your drone’s camera to ensure the best possible image quality.
One advantage of using a drone is that it allows you to capture the vastness and scale of the desert landscape in relation to the camels. This can be achieved by using a wide-angle lens and positioning the drone at a higher altitude. As the camels move through the desert, following them with the drone can create dynamic footage that showcases their movements and behavior.
Another technique to try when using a drone for aerial shots is capturing patterns and textures of the desert sand. By flying the drone low to the ground and shooting straight down, you can create abstract images that highlight the patterns created by the winds and the shifting of the sand.
Using a drone for aerial shots can also give you the opportunity to capture shots of a larger group of camels. This can be done by positioning the drone at a high altitude and using a telephoto lens to zoom in on the camels, creating a sense of depth and scale.
Overall, using a drone for aerial shots in camel photography can provide a unique and breathtaking perspective. By practicing safety measures, adjusting camera settings, and experimenting with different angles and compositions, you can create stunning and captivating images that showcase the beauty of these majestic creatures in their natural habitat.
| Pros | Cons |
|---|---|
| -Capture unique perspective from above -Showcase vastness and scale of landscape -Capture patterns and textures of sand -Opportunity to capture larger groups of camels |
-May require permits and following regulations -Drone batteries can drain easily in desert environment -Safety concerns when flying near other animals or humans -Need to adjust camera settings for optimal image quality |
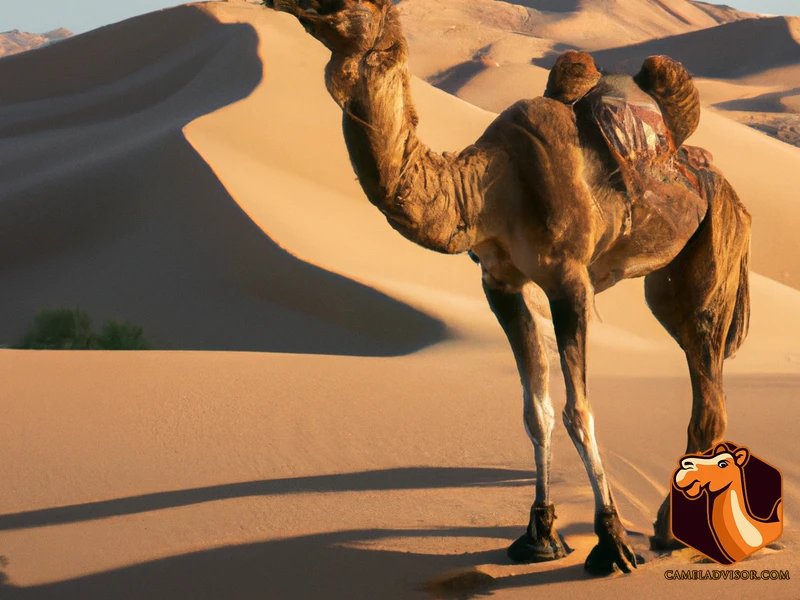
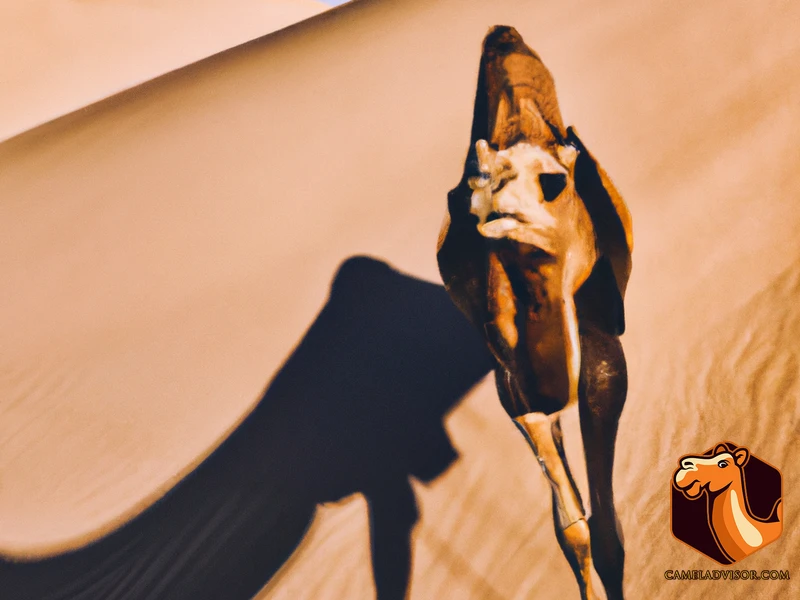
Climbing a Dune for Unique Perspective
When it comes to capturing unique and compelling camel photographs, trying out different perspectives can be a game-changer. One way to achieve a distinct point of view is by climbing a dune. Here are some tips to get the most out of this approach:
- Choose the right dune: Look for sand dunes that are not too steep, so that you can climb them without too much difficulty. The dunes should also have interesting shapes and patterns, as this will enhance the composition of your photos.
- Be prepared: Climbing a dune can be physically demanding, so make sure you wear comfortable, sturdy shoes and bring plenty of water to stay hydrated. It’s also a good idea to wear protective gear, such as a hat and sunscreen, to shield you from the sun’s rays.
- Use a tripod: Climbing a dune can be tiring, and holding your camera steady can be challenging. Using a tripod can help stabilize your camera and ensure sharp photos.
- Experiment with angles: Once you reach the top of the dune, take some time to look around and experiment with different angles. You can shoot straight down to capture the ridges and patterns of the dune, or place your camera lower to the ground to create a more dramatic effect.
- Adjust your settings: The bright desert sun can create harsh shadows and blow out highlights in your photos. Try adjusting your camera’s aperture and shutter speed to create a balanced exposure, or use a polarizing filter to reduce glare.
- Be mindful of the environment: While climbing a dune can be a thrilling experience, it’s important to be respectful of the environment around you. Avoid trampling vegetation or disturbing wildlife, and take your trash with you when you leave.
Climbing a dune can offer a unique perspective and add interest to your camel photography. Just remember to plan ahead, stay safe, and be creative with your composition to truly make your photos stand out.
Getting Close-Ups with a Telephoto Lens
When you want to capture close-up shots of camels without getting too close, a telephoto lens is a great tool. The longer focal length of a telephoto lens lets you zoom in on the animal, making it appear closer to you than it actually is.
To get started, attach your telephoto lens and find a good spot to photograph the camels from a distance. Look for a spot where you can see the animals clearly and where there aren’t any obstructions that could get in the way of your lens.
Once you have found your spot, focus your lens on the camels and adjust your aperture to create the desired depth of field. A shallow depth of field can help blur the background and make the camels the main focus of your photo.
When you’re ready to take the photo, use a tripod or rest your camera on a stable surface to keep it steady. This is especially important when you’re using a long telephoto lens, which can be heavy and difficult to hold steady for long periods of time.
Experiment with different angles and compositions, taking full advantage of the telephoto lens to get sharp, detailed shots of the camels. Don’t be afraid to zoom in even closer to highlight details like their fur or faces.
Keep in mind that using a telephoto lens can also compress the distance between objects, making it seem like the camels are closer together than they actually are. Use this to your advantage by playing with the arrangement of the camels in your shot to create interesting compositions.
A telephoto lens is a valuable tool for capturing stunning close-up photos of camels from a safe distance. Just remember to use a stable surface to keep your camera steady and experiment with different angles and compositions to get the perfect shot.
Playing with Perspectives in Camel Photography
As you continue to explore the wonders of camel photography, you’ll begin to realize that there’s a whole world of perspectives waiting to be captured. Playing with how you shoot these majestic creatures can result in stunning and unique images that stand out from the rest. By utilizing framing, scale, lighting, reflections, and shadows, your camel photos can take on a whole new life of their own. So, let’s dive in and discover the various ways in which you can play with perspectives in camel photography.
Framing with Leading Lines
Framing with leading lines is a clever technique that can add depth and drama to your camel photography. By using natural lines and shapes in the landscape, you can draw the viewer’s attention towards the subject in a subtle and visually-pleasing way.
What are Leading Lines?
Leading lines are lines, shapes, or patterns that guide the viewer’s eye towards the subject of the photo. They can be natural, like the curves of sand dunes or the ripples in the sand, or man-made, like a fence or a road.
How to Use Leading Lines for Camel Photography?
To use leading lines in your camel photography, you need to be creative and observant. Look for interesting shapes and patterns in the environment that can help you guide the viewer’s eye towards the camels. Here are some tips to get you started:
| Tip | Description |
| 1 | Look for natural lines and curves in the landscape, such as sand dunes, rocks, or trees. |
| 2 | Position yourself and the camels so that the lines point towards them. |
| 3 | Use man-made structures, like a fence or a wall, to create leading lines. |
| 4 | Experiment with different angles and perspectives to find the most effective composition. |
| 5 | Remember to keep the camel as the main focus of the photo, even when using leading lines. |
Examples of Camel Photography with Leading Lines
Below are some examples of camel photography that use leading lines to create a more dynamic and compelling composition:
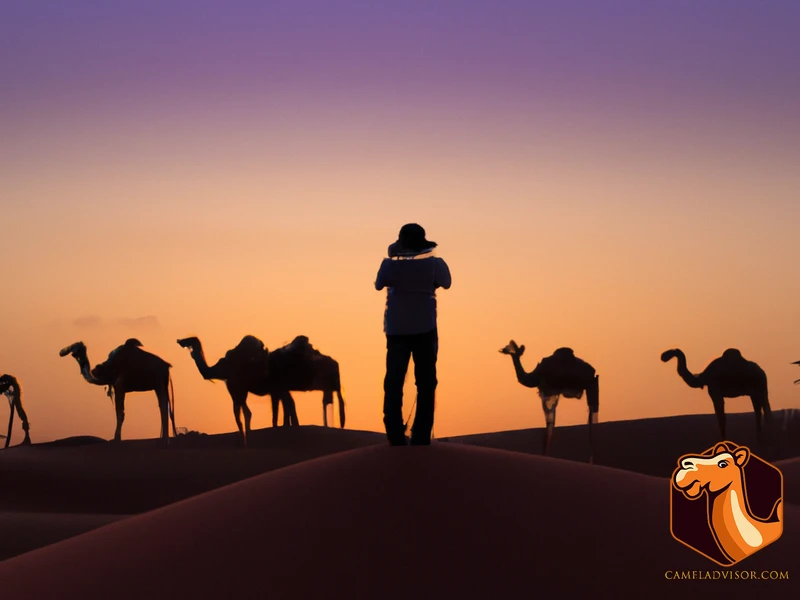
– A photo of a camel caravan on a winding road, where the road acts as a leading line that draws the viewer’s eye towards the camels in the distance.
– A photo of a lone camel standing on a sand dune, where the curves of the dune create a natural leading line that leads the viewer’s eye towards the camel.
– A photo of a group of camels walking through a narrow passage between two sandstone cliffs, where the cliffs act as man-made leading lines that frame the camels and add drama to the scene.
Conclusion
Framing with leading lines is a simple yet effective technique that can help you create more powerful and engaging camel photography. With a bit of creativity and observation, you can use the lines and shapes in the landscape to draw the viewer’s eye towards the camels and add depth to your photos.
Playing with Scale
Playing with scale is an effective technique for adding visual interest and drama to your camel photography. By manipulating the size relationships between the camels and their surroundings, you can create unique and attention-grabbing images. Here are some ways to experiment with scale:
1. Using Size as a Point of Reference: Place a person or object in the foreground or background of the shot to give viewers a sense of scale. This can help them understand the true size of the camels and emphasize their grandeur in the desert landscape.
2. Enhancing the Visual Impact of the Camels: Use a wide-angle lens to capture the camels in the foreground and the distant dunes in the background. This technique will make the camels look larger than life and add a sense of drama to the image.
3. Creating Depth and Dimension: Experiment with different focal lengths to alter the perceived distance between the camels and the background. This technique can create a more immersive and three-dimensional experience for viewers.
4. Playing with Camera Angles: Experiment with shooting from low or high angles to create a dramatized effect that showcases the camel’s size and strength. This can help highlight the unique qualities of camels that might not be noticeable from a standing or eye-level perspective.
5. Exploring Texture and Contrast: Focus on the camel’s fur or wrinkles to create contrast between the soft textures of the fur and the harsh, sandy landscape. You can also play with shadows and lighting to enhance the texture of the camel’s skin and fur, showcasing the unique features of these animals.
By experimenting with scale in your camel photography, you can create powerful and engaging images that capture the beauty and majesty of these desert giants.
Experimenting with Different Lighting
Experimenting with Different Lighting
Lighting is one of the most crucial elements in photography, and camel photography is no exception. Experimenting with different lighting conditions can help you create stunning and unique images of these majestic animals. Here are some lighting techniques to try:
| Technique | Description |
|---|---|
| Golden Hour | Shoot during the Golden Hour, which is the hour after sunrise and the hour before sunset. The soft, warm light during this time can create a beautiful, almost mystical atmosphere in your camel photography. |
| Backlighting | Shoot against the light to create a dramatic and silhouette effect. This can be especially effective during sunrise or sunset when the sky has a range of colors. |
| Side Lighting | Shoot when the sun is low in the sky to create dramatic shadows and contrast. This can create a striking visual effect in your camel photography. |
| Cloudy Days | Do not let a cloudy day discourage you. Clouds can create a soft and diffused light that can be ideal for taking close-up camel portraits. When cloudy, the colors of the desert change and become more vivid making your image pop. |
It is important to remember that different lighting conditions give different results. Play around with the lighting to see how it impacts the final image. For instance, try to take pictures of camels at different times of the day to see how the lighting condition transforms over the day. This will also help you to shoot in different conditions and range your portfolio. You could also experiment with different apertures and shutter speeds to see how they impact the final image. Remember that photo-editing can always improve substantially the final image, so don’t be too hard on yourself if something does not appear to be perfect.
Using Reflections and Shadows to Your Advantage
One way to add interest and depth to your camel photography is by utilizing reflections and shadows in your compositions. Below are some tips for incorporating these elements into your images:
| TIP | DESCRIPTION |
| 1. | Look for puddles of water or other reflective surfaces, such as mirrors or shiny metal, that can reflect the camels and add visual interest to your shots. |
| 2. | Experiment with different angles and heights to capture the reflection in a unique way. This could mean getting low to the ground or shooting from a higher vantage point. |
| 3. | When shooting in bright sunlight, use the shadows to your advantage by placing the camels in a way that creates interesting shapes and patterns. |
| 4. | Try shooting during the golden hour – the hour after sunrise or before sunset – to capture the warm, glowing light that can highlight both reflections and shadows. |
| 5. | In post-processing, you can enhance the reflections and shadows by adjusting the contrast and exposure levels to bring out more detail. |
By incorporating reflections and shadows into your camel photography, you can create more dynamic and visually intriguing images.
Post-Processing Tips for Camel Photography
Once you have captured a series of stunning camel photographs, it’s time to fine-tune and polish them through post-processing. By performing post-processing techniques, you can highlight specific features of the camel and the desert surroundings, adjust exposure levels, and enhance colors to achieve a professional finish. In this section, we will explore a variety of post-processing tips that will take your camel photography to the next level. So, let’s dive in!
Choosing the Right Editing Software
Post-processing can bring out the best in your camel photography. And to do that, you need the right editing software. Consider the following factors when choosing the right editing software for your camel photos:
| Factor | Options |
|---|---|
| Editing Features | Adobe Photoshop, Lightroom, GIMP, Corel PaintShop Pro |
| User Interface | Adobe Lightroom, CyberLink PhotoDirector, Skylum Luminar, Capture One |
| Price | Adobe Creative Cloud ($20.99/month), GIMP (free), Skylum Luminar ($89), Capture One ($299) |
| Compatibility with Your Computer | Make sure your editing software is compatible with your computer or laptop’s operating system (Windows or iOS). |
| Overall Functionality | Consider what your overall needs are when editing your camel photos. Do you need advanced features or just basic editing options? This will help determine which software is best suited for you. |
When choosing the right editing software for your camel photos, always consider your personal preferences and style of editing. Take time to learn how to use the software properly to get the most out of your camel photos. With the right editing software and a bit of practice, you can create stunning camel photographs that capture the beauty and majesty of these amazing animals.
Adjusting Exposure Levels to Bring Out Details
When it comes to adjusting exposure levels in camel photography, there are a few important things to keep in mind. Achieving proper exposure in your photos is crucial for bringing out the details in your subjects and creating a visually appealing image.
What is Exposure?
Exposure refers to the amount of light that enters your camera’s sensor when you take a photo. When your camera is set to automatic mode, it will automatically adjust the exposure based on the available light. However, when shooting in challenging lighting situations, you may need to manually adjust the exposure to get the best results.
How to Adjust Exposure Levels in Camel Photography
To adjust exposure levels in camel photography, you can use a combination of aperture, shutter speed, and ISO settings. These settings can be adjusted on your camera’s manual or semi-manual modes.
Aperture: The aperture setting controls the amount of light that enters your camera by adjusting the size of the lens opening. A larger aperture (smaller f-number) will allow more light to enter, which is ideal for low light situations. However, a larger aperture will result in a shallower depth of field, which may not be ideal for all types of shots.
Shutter Speed: The shutter speed setting controls how long your camera’s shutter stays open when taking a photo. A longer shutter speed will allow more light to enter, but may result in blur if the subject is moving. A faster shutter speed will freeze motion, but may not let in as much light.
ISO: The ISO setting determines how sensitive your camera’s sensor is to light. A higher ISO will allow you to shoot in low light situations, but may result in grainy or noisy images.
Bringing Out Details in Post-Processing
Once you have captured your camel photos with the appropriate exposure, you can further enhance the details in post-processing. This can be done using photo editing software such as Adobe Lightroom or Photoshop.
Adjusting Exposure in Post-Processing: In editing software, you can adjust the exposure levels by adjusting the brightness, contrast, and highlights and shadows settings. This will help bring out details that may have been lost in under- or over-exposed shots.
Using the Histogram: The histogram in your editing software can also be a helpful tool for adjusting exposure levels. The histogram is a graphical representation of the tonal range in your image, showing the distribution of shadows, midtones, and highlights. You can use this to ensure that your image has a balanced exposure with details in all areas.
Adjusting exposure levels in camel photography is an important step in capturing stunning images with the necessary details. With the right combination of camera settings and post-processing techniques, you can optimize your photos for the best results.
Enhancing Contrast and Color
When it comes to enhancing contrast and color in camel photography, there are a few techniques that can make your images stand out. One way to do this is by using software such as Adobe Lightroom or Photoshop to make adjustments to the image’s exposure, saturation, and contrast. Here are some tips to make your image pop:
| Technique | Description |
| Adjusting Exposure and Contrast | Increasing overall exposure can bring out detail in the camel’s fur and the desert landscape. Adjusting the contrast can make your image appear more dramatic. |
| Using the Saturation Slider | Increasing saturation can make colors pop, but be careful not to overdo it as it can create an unrealistic look. |
| Using the HSL (Hue, Saturation, Luminance) Panel | This panel allows you to adjust the specific color channels in your image. For example, you can make the blue of the sky appear more vibrant or desaturate the oranges in the sand. |
| Using the Curves Tool | This tool allows you to adjust the tones in your image. You can make the shadows darker or lighten the highlights for a more balanced look. |
Remember, when enhancing contrast and color in your images, it’s important not to overdo it. Always try to make your adjustments look natural and in line with your creative vision. By utilizing these techniques, your camel photography can really make an impact.
Cropping and Straightening Images for a Professional Look
When it comes to getting a polished and professional look for your camel photography, cropping and straightening your images can make a big difference. Here are some tips to keep in mind:
- Use the Rule of Thirds: When cropping your image, consider using the rule of thirds to create a more visually balanced composition. This involves dividing the image into thirds both horizontally and vertically, and positioning key elements along these lines or at the intersections.
- Straighten Your Horizons: If your image features a horizon, ensure that it is straight. A crooked horizon can make even the most beautiful photograph appear unprofessional. Most photo editing software includes a straightening tool that allows you to easily adjust the angle of your image.
- Experiment with Aspect Ratios: Cropping your image to a different aspect ratio can alter its visual impact. For example, a square crop can make your image feel more balanced and centered, while a panoramic crop can create a sense of scale and distance.
- Avoid Over-Cropping: While cropping can be an effective way to simplify your image and draw attention to key elements, be careful not to overdo it. Over-cropping can result in loss of detail and resolution.
- Check Your Resolution: Before cropping your image, be sure to check the resolution to ensure that it is sufficient for your intended use. If you plan to print your image, a higher resolution is generally required than for online use.
By keeping these tips in mind and experimenting with different cropping and straightening options, you can take your camel photography to the next level and achieve a more professional look.
Conclusion
As we conclude our exploration of camel photography through different angles and perspectives, it becomes evident that there is no one-size-fits-all approach to capturing these magnificent creatures in their natural environments. Instead, a combination of factors, such as understanding camel behavior, selecting the right equipment, and experimenting with different perspectives, will help you create stunning images that stand out from the crowd.
By shooting from the ground level, using a drone for aerial shots, climbing a dune for unique views, and getting close-ups with a telephoto lens, you can capture camels from different angles and bring out their distinct personalities. Playing with perspectives, such as framing with leading lines, playing with scale, experimenting with different lighting, and using reflections and shadows, will take your camel photography to the next level.
When it comes to post-processing, the choice of editing software, adjusting exposure levels, enhancing contrast and color, and cropping and straightening images will all contribute to a professional-looking final product. But remember, always strive to maintain the authenticity of the scene and avoid over-editing your images.
We hope this article has provided you with valuable insights into the world of camel photography and inspired you to take your own unique shots. So, grab your equipment, head out into the desert, and start exploring the endless possibilities of camel photography!
Frequently Asked Questions
What is camel photography?
Camel photography is the art of capturing images of camels in different settings, light, and perspectives.
What is the best time of day for camel photography?
The golden hour, just after sunrise and just before sunset, provides the best light for camel photography.
Can I use a smartphone camera for camel photography?
While smartphone cameras have improved considerably, it’s recommended to use a high-quality DSLR camera with a telephoto lens for best results.
What should I wear when photographing camels?
Wear comfortable clothes that provide protection against the sun, sand, and wind.
Is it safe to get close to camels?
Camels are generally docile animals, but it’s best to maintain a safe distance to avoid accidental injury from their powerful kicks.
Do I need a permit to photograph camels?
In some countries, you may need a permit to photograph camels in the wild or on private property. Check local laws and regulations before your shoot.
How do I capture unique perspectives in camel photography?
Try shooting from unusual angles or using objects like sand dunes or rocks to create interesting foregrounds.
What editing software is best for camel photography?
Adobe Lightroom and Photoshop are popular software choices for editing camel photography.
What should I consider when cropping and straightening camel images?
Cropping and straightening images can help to enhance the composition and create a more professional look. Consider the rule of thirds and use the straightening tool to align the horizon.
What is the most important factor in camel photography?
The most important factor in camel photography is understanding and respecting the animal’s behavior and environment.